Blog Details

Crispy Skin: The Secret to Perfect Roasted Chicken

There are few aromas more inviting than a chicken roasting in the oven, filling your home with warmth and promise.

But while the succulent meat is always a delight, the true mark of a master roaster lies in the skin. That coveted, golden, crackling, crispy roasted chicken skin is what elevates a simple meal into an unforgettable culinary experience.

Too often, however, home cooks face the disappointment of rubbery, pale, or soggy chicken skin. You follow the recipe, you wait patiently, but the crispiness remains elusive. What’s the secret?

It’s not just one magic trick, but a combination of often-overlooked techniques that work in harmony to transform that humble chicken into a masterpiece of texture and flavor. Get ready to ditch the soggy skin for good!

The Foundation: Starting Dry is Key

This is the golden rule for crispy roasted chicken: moisture is the enemy of crispiness.

  1. Pat It Bone Dry: This is perhaps the most crucial step. After unwrapping your chicken, pat it aggressively dry, both inside and out, with paper towels. Get into every nook and cranny. The drier the skin is before it goes into the oven, the crispier it will become. Don’t skip this!
  2. Air Dry (The Overnight Secret): For truly phenomenal results, place the patted-dry chicken on a wire rack set over a baking sheet . Refrigerate it, uncovered, for at least 4-6 hours, or even better, overnight. The cold, dry air in the fridge will further dehydrate the skin, setting you up for maximum crispness

A whole chicken air-drying on a wire rack in preparation for roasting.

The Heat Equation: High & Consistent

Once dry, it’s all about heat management.

  1. High Initial Heat: Start your oven at a higher temperature, typically 425°F (220°C). This initial blast of high heat helps to rapidly render the fat beneath the skin and start the browning process.
  2. Consider Lowering (Optional): After 15-20 minutes at high heat, you can reduce the temperature to 375-400°F (190-200°C) for the remainder of the cooking time. This allows the chicken to cook through without burning the skin. An accurate oven thermometer is a Kitchen Whizdom Essential for precise baking.
  3. No Crowding: Ensure your roasting pan is not overcrowded. Give the chicken plenty of space so hot air can circulate freely around all sides. Overcrowding traps steam, making skin soggy.

The Flavor & Texture Boosters: Fat & Seasoning

While drying is critical, a few additions can enhance the crispiness and flavor.

  1. Fat is Your Friend (Under the Skin): Don’t just rub oil on top! Gently separate the skin from the breast and thigh meat and rub a tablespoon or two of butter or olive oil directly onto the meat, under the skin. This bastes the meat from the inside and helps render the fat out of the skin.
    • You can also rub a little fat on the exterior. For a healthy option, try a high-smoke-point olive oil, ensuring your crispy roasted chicken is both delicious and nutritious.
  2. Salt Liberally: Salt doesn’t just season; it aids in dehydration. A generous sprinkle of coarse salt (like kosher salt) on the skin draws out moisture. You can even mix salt with herbs (from our previous “Spice Secrets” blog perhaps?) and rub it all over.
  3. Avoid Basting (Unless Done Carefully): Traditional basting adds moisture, which can soften skin. If you must baste for flavor, do so only in the last 15-20 minutes, or consider basting the meat under the skin or the pan juices, not directly on the skin.

The Grand Finale: Resting

  1. Rest It Out: Once cooked (a reliable Kitchen Whizdom Meat Thermometer should read 165°F (74°C) in the thickest part of the thigh), remove the chicken from the oven and let it rest, uncovered, for at least 10-15 minutes before carving. This allows the juices to redistribute, ensuring tender meat, and helps the skin maintain its crispness as residual heat continues to work.

By combining thorough drying with proper heat and strategic fat and seasoning, you’ll consistently achieve that coveted, perfectly crispy roasted chicken skin. Say goodbye to disappointments and hello to applause at your next dinner table!


FAQ: Achieving Crispy Roasted Chicken Skin

  1. Is it really necessary to air-dry the chicken overnight in the fridge?

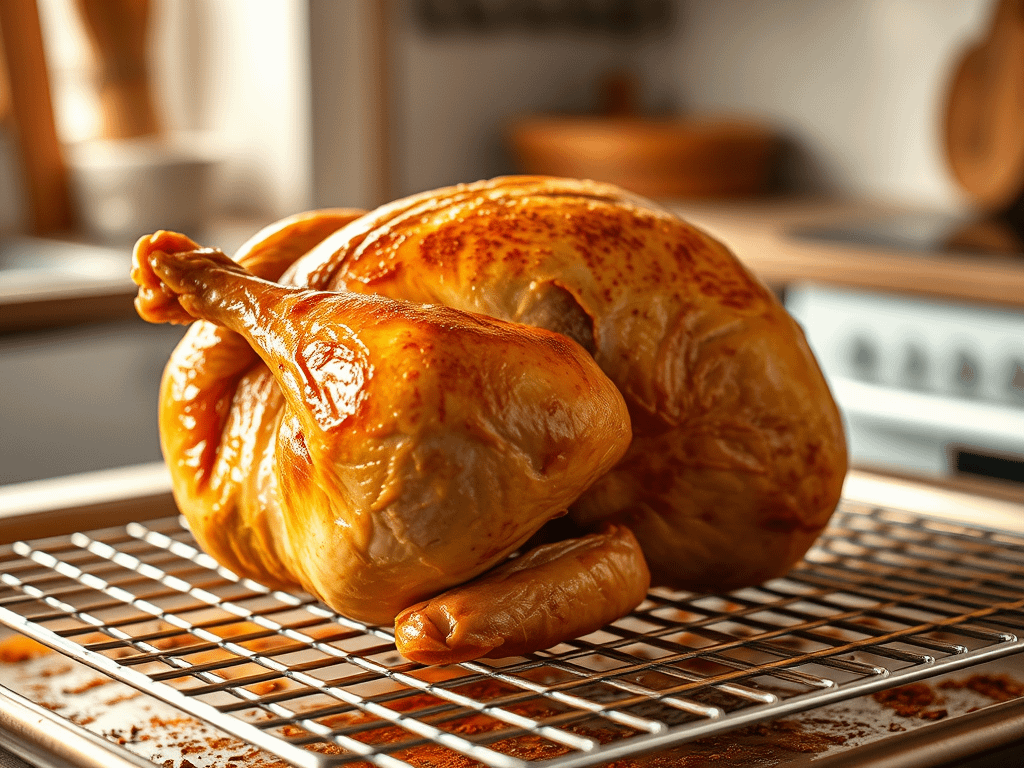
    While not strictly necessary for edible results, it is the single most effective method for achieving truly extraordinarily crispy skin. The prolonged exposure to cold, dry air draws out surface moisture far more effectively than just patting dry, making a significant difference in the final texture.

  2. What if my chicken skin still isn’t crispy?

    Re-check your fundamental steps: * Was it dry enough? (Patting and especially air-drying are key.) * Was the oven hot enough? (Use an oven thermometer.) * Did you overcrowd the pan? (Ensure good air circulation.) * Did you baste too much? (Added moisture can make skin soggy.) You can also try placing the chicken under the broiler for 1-2 minutes at the very end, watching it very closely to prevent burning.

  3. Can I achieve crispy skin on chicken pieces, not just a whole chicken?

    Absolutely! The same principles apply. Pat chicken thighs, drumsticks, or breasts extremely dry. Cook skin-side down first if pan-searing, then flip. For baking, place skin-side up on a rack to allow fat to render away and air to circulate.

  4. Does adding baking powder help with crispy chicken skin?

    Yes, baking powder (specifically aluminum-free, double-acting baking powder) can be a secret weapon for even crispier skin, especially on chicken wings or pieces. A small amount (e.g., 1 teaspoon per pound of chicken) mixed with salt and spices and rubbed onto the skin helps raise the skin’s pH, which promotes browning and crisping. Just be sure not to use baking soda, which will have the opposite effect!

Our Products

Products

Blogs

Review Your Cart
0
Add Coupon Code
Subtotal